Tuesday, July 31, 2012

blueberry-nectarine pie

this month, good things come in threes, as in three things made using the book "baking with julia" for the tuesdays with dorie challenge.  this week, we made blueberry-nectarine pie and the event was hosted by hillary of manchego's kitchen and liz of that skinny chick can bake .  be sure to visit either of their websites to see the recipe or buy the book!

first step was to mix the pie dough.  the recipe gives three methods for mixing the dough; by hand, by mixer or by food processor.  i chose to mix mine in the food processor.
the recipe is pretty simple but it does something most recipes do not, it calls for a combination of real butter and shortening.  most importantly, it calls for chilling the shortening and cutting it into neat little cubes.  it also requires a somewhat lengthy chilling time(several hours) for the dough and a short chill time for the completed pie prior to baking.  i didn't adhere to the chilling times and can honestly say, the soft dough was easy to work with and the baked pie looked fine.  perhaps i should also mention that making and baking pies is a large part of my job and maybe this is easy for me since i am accustomed to working with pie dough.  maybe, but it could also be that this time, i was lucky.

so there i was shopping in trader joe's with the husband as i picked up two baskets of blueberries, selected half a dozen white nectarines all the while hoping that there would be extra fruit for me...

 white nectarines are very delicate in flavor, kind of like a washed out peach but they are still tasty.

 the recipe calls for cooking the filling prior to making the pie.  knowing how much the blueberries would color the filling, i doubled up the amount of flour, actually i think i may have added more than double, and just gently tossed the filling and then scraped it into the pie shell.  i wanted to preserve the color combination that you see above; pale slices of nectarines swimming in a purple blueberry pool.

i remember reading the recipe and the author states to use only 2 teaspoons of lemon juice so that the pie isn't tart.  this perplexed me.  two teaspoons surely wouldn't have the power to do that.  and no, it didn't.  to add more flavor, i also included some cardamom and vanilla bean paste.

 when the pie was finished in the oven, it was obvious that it was a blueberry pie.  despite my efforts, the nectarines lost their battle with the blueberries since it dominated both the color and the flavor profile of the pie.  next time, i would reverse the proportions and use 2 cups blueberries with 3 cups nectarines or better still, 3 cups peaches (or apricots, just throwing that out there).

love the color of the filling, the pie tasted pretty good too...

Sunday, July 29, 2012

the little fig tree that could

gardening; love it or hate it, you choose.  personally, i love it no matter how frustrating and unsuccessful it is for me at times.  why?  because sometimes, it all falls into place, the stars align and magic happens in the garden.  in my case, the little fig tree on the sunny side of the house has decided that this is the year to really produce fruit and we have been enjoying the bounty.

about 5 years ago, we went on a typical beach trip down to the gulf of mexico.  while we were there, we stopped in at one of the sketchiest flea markets we have ever encountered-scary, almost.  when we spotted a vendor selling plants, we stopped to see what was available and took a chance on a tiny fig tree.  the first few years, the little tree hung on as we moved it from spot to spot hoping to find a happy home for it.  we diligently wrapped it up in cardboard and blankets and covered it in plastic each winter.  it wasn't until we put it in it's current spot that it decided to grow and grow it has-about 9 feet tall now.  better still is the fact that it is producing fruit at a rate that has me picking figs by the dozen.

brown turkey figs fresh from the tree

on a couple of days, i picked full flats of figs

while i had lots of fruit to work with, it just wasn't enough to make a batch of jam-my first choice.  so, what to do???  sorbet, that's what!!!  after a quick search on the internet, i had a recipe to start with.

 i cooked the figs with a little vanilla paste

 the recipe called for only 1/3 cup sugar so i added a couple tablespoons of pure honey

 after cooking, the mixture is pureed and water, wine and lemon juice is added.  the recipe called for port but we were out of port so i subbed cabernet sauvignon.

 beautiful puree with little flecks of vanilla bean and fig seeds.

 after processing, it went into the freezer to set.  perfect for a hot summer day

looking forward to next year, there are visions of fig jam in my future...

Friday, July 20, 2012

tomato season means blt's!!!!

this week's tuesdays with dorie post featured a loaf of freshly baked semolina bread.  it was over 90 degrees, it was too hot and humid to bake bread, but i went ahead and did it anyway.  actually, the day i was baking the bread was rainy and gloomy and the oven didn't heat up the house too badly for a change.

with just the two of us in the house, it can sometimes be difficult to finish a loaf of bread before it becomes a deadly weapon or turns green and fuzzy.  but this is tomato season and the challenge now is to have enough bread and bacon to eat all of the tomatoes we picked from the garden.  i know, it's a tough job but somebody's got to do it...

for the last 8 years, i have worked in a restaurant that is famous for its breakfast fare.  needless to say, i am well aware of the best methods for cooking (and burning) bacon.  so how does a busy restaurant cook tons (literally tons each year) of bacon?  they do it in an oven, on a sheet pan and not on a grill or a stove top-that's too labor intensive.

first of all, start off with a decent bacon.  i use one that is uncured and dry rubbed.  next, line a heavy duty pan (i use restaurant style half-sheet pans) with a piece of baking paper (not waxed paper!) and then i lay out the bacon so that it slightly overlaps.  by shingling the bacon, you slow down the process and allow it to cook without crisping to quickly.

 heat the oven to 350.  if you used a convection mode, you will need to watch it closely, or you can turn down the temp by 25 degrees.  to keep it soft and pliable, you will need to take the bacon out of the oven after about 10-15 minutes and turn it over.  then bake it for about another 10 minutes so that all of the white parts are slightly translucent and just beginning to show signs of caramelizing.  remove it from the oven at that point.  remember that the bacon will continue to cook after it comes out of the oven so stopping here allows for the carryover of heat to finish the job out of the oven.

place a few sheets of paper towel on a clean tray and gently lift some of the warm bacon off the baking tray and place it on the paper to blot the grease.  top it off with more paper and repeat until all of the bacon is blotted dry.  now you have cooked bacon that isn't greasy and isn't likely to break into little shards when you bite into your sandwich-nothing worse than hard, crunchy bacon shards falling out all over your lap!

 vine ripened tomatoes...what a concept!  everyone should have a tomato plant or two just so that they can make tomato sandwiches (a true southern obsession) as well as blt's!

 the spread-we had kohlrabi slaw using freshly picked kohlrabi from our garden.  right now is not the season for lettuces and other salad greens due to the heat but that didn't stop a few rogue arugula plants from popping up.  needless to say, we ate our sammiches with arugula.

 the bread; a really simple loaf to make, i highly suggest making one.  if you do not have a copy of baking with julia or how to bake, find the recipe here or here(with the nice addition of rosemary)
.
now that's a sandwich!

Tuesday, July 17, 2012

semolina bread; tuesdays with dorie

it was such a dreary and cool morning on saturday that i decided to make the semolina bread for this weeks twd challenge.  after the scorching hot weather of june and early july, it was nice to have a break from the heat-now if we could just do something about the rain...

the tuesdays with dorie festivities this week are being hosted by renee of the way to my family's heart and anna of keep it luce.  be sure to click on those links to see what everybody has baked-there are over 100 of us participating.

semolina bread is a favorite of mine.  something about the color, the golden hue of the bread...the simplicity of the recipe-a definite plus for me.  this recipe is in nick malgieri's book, "how to bake" as well as baking with julia and i have made it before.  the two recipes are almost identical-the only real difference is how much flour is added to the sponge with the total amount called in the recipe for being the same.  the chatter over on twd was that it was salty-i did cut it back to 1 1/2 teaspoons after reading several comments on the amount being too much.  however, i think that between cutting the salt and the high humidity of the day, my bread was in a hurry even though i wasn't!

i didn't quite understand the description for the slashes so i just did 3 on the diagonal with a serrated knife.

a close up of the slash.  there is a fine line between too deep and not deep enough.  either way, you need a sharp knife or you run the risk of deflating the bread.

the finished loaf.  it took at least 15 minutes longer in my oven (i keep a thermometer in it to monitor the temp for accuracy)  to get the internal temp to 207 degrees, i gave up on getting it to 210.

the interior of the loaf-i think i done good this time!  the crust was nice and chewy and like a real artisan bread crust!  we are having the rest with blt's since it is tomato season...


tomatoes and arugula from the garden, uncured-dry rub bacon from trader joe's and homemade bread.
droolworthy, isn't it...

Friday, July 13, 2012

millet tabbouleh

wandering through thrift stores is a favorite past time of mine.  visiting the used book store is another.  whichever the destination, i am bound to make my way out to the car carrying an armload of stuff, especially cookbooks.  recently, i found a hardback copy of mark bittman's "how to cook everything" for $7.99 and it was sporting the tag color of the week; serious thrift shoppers know that means it was discounted, i picked it up for $4 and change.  yesterday, i mailed it to my older daughter who has expressed an interest in cooking.  not to worry, a couple of months ago, i found a paperback copy at the used book store for $2.  wow-two copies of that book and less than $10 spent.  

you would think that as a cia grad that a comprehensive book like that wouldn't be of much interest to me.  after all, i should know the material.  however, i gave up the cooking part a long time ago to pursue the baking/pastry side and with a husband who is a chef, i don't need to do much cooking.  with the girls out of the house, i really don't need to do much cooking.  but for some reason, i am finding myself in the kitchen after spending the day in a kitchen, cooking.  and i really mean cooking from scratch using as many ingredients as i can pick from the garden.  

reading through this book, i stumbled upon what i think is the best tabbouleh recipe and more importantly, it is a perfect way to use the abundance of tomatoes and parsley out in the garden.  while the traditional recipe calls for bulgur, i have been experimenting with other grains.  the last batch i made had red quinoa in it.  lurking in the cupboard was a jar of millet and today, it became the grain of choice for my tabbouleh.

my husband scoffs at the idea of eating millet-"i'm not a bird..." and i understand his point since he is constantly filling the feeders outside with a seed mix that includes millet.  but this is a great way to get big kids like him to play nice and try new foods...

millet is starchy and it must be rinsed a few times after cooking to prevent it from becoming sticky and pasty.  the method i used can be found in a tabbouleh recipe from the vegetarian times.  i used their cooking method and substituted it for the cooked bulgur in mark bitumen's recipe.


having an herb garden is wonderful!  especially when you can plant whatever you want!!!  pictured here are the three types of parsley i used.  the large one on top is mitsuba, a japanese parsley.  it looks like flat leaf parsley on steroids.
with only minor changes, i reduced the amount of olive oil called for in the recipe and added a little diced cucumber since it is summer and i do have them in the garden, this is the result.

millet tabbouleh
adapted from "how to cook everything" by mark bittman
makes about 5 cups 

1/2 cup millet
2 cups fresh parsley leaves
1 cup fresh mint leaves
2 cups diced fresh tomatoes
1/2 cup diced cucumber
1/2 cup diced red onions
4 tablespoons fresh squeezed lemon juice
4 tablespoons olive oil
1 clove garlic, crushed
salt and pepper to taste
cook the millet according to the instruction on the package or by using this link and allow it to cool.  chop the parsley and mint leaves somewhat coarsely.  combine the cooled millet with the remaining ingredients, season it with the salt and pepper and chill the salad for a few hours to blend the flavors.  while chilling it allows the flavors to meld and develop, it will taste best if it is allowed to come to a near room temperature before serving.  

Tuesday, July 10, 2012

revisiting a favorite


i am hard at work on what i hope will be my next book.  one of the recipes i plan to include is for the quesadilla cakes that i made a while back.  in order to get my notes cleaned up and ready for the folks up north, i decided to make them this morning.  

first thing i did was grab the camera and my nifty new macro lens.  best investment i have made this year:  digital photography classes.  second best, that lens.  

the original recipe is found here.  when i made them, i used parmesan cheese because that is what the nice young lady working in a local mexican bakery told me they use.  all research on the internet mentions a traditional choice of cotija with parmesan as a close substitute.  this morning, i bought a package of crumbled cotija.

 it resembles finely crumbled feta or parmesan but the flavor is milder than either of those.  i also think it is a little saltier than parmesan but that could just be this particular brand.

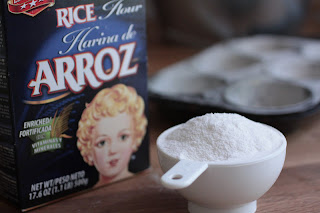
 rice flour is a popular ingredient in el salvador, i have a co-worker from there and she mentions baking with it at home too.  this brand, tres estrellas, is easy to find in supermarkets; just look in the section where they stock the latino ingredients.

 don't be lazy-generously grease and flour the pan to make it easy to get the cakes out.  i used spray grease and i am thinking that next time, i will use shortening since they still stuck-even with the flour!

tasty!!!  go on a cotija hunt and try these out, you will enjoy them- i promise!

Tuesday, July 3, 2012

a tale of two biscotti's-tuesdays with dorie

i must have blinked; somehow, it is suddenly tuesday and time for the next (tuesdays with dorie) post from baking with julia. even better is the fact that this month, we will do 3 recipes.  first up is the hazelnut biscotti recipe hosted by jodi of homemade and wholesome and katrina of baking and boys! be sure to visit either of their blogs for the complete recipe or better still, buy a copy of the book baking with julia and bake along with us.

baking biscotti is something special for me.  years ago, i developed a series of recipes for biscotti and we actually opened a small wholesale bakery that specialized in biscotti.  we baked more than 20 flavors and had about 40 wholesale accounts as well as a small mail order business.  fast forward 15 years and i have moved on; i no longer operate my own baking business.  however, i still get requests for biscotti and bake them as gifts for friends and family.  in my current baking job, i make them just to grind them into crumbs and make cookie crust pie shells with them.  suffice it to say, i was curious to try this recipe.

upon reading the recipe, i realized that i had the option to change the nuts used.  that was a good thing since i had a severe shortage of hazelnuts (none actually) and in the 105 (no not kidding) degree heat, no desire to go out to the store.  i chose pistachios and lemon zest to flavor mine since that is one of my favorite biscotti combinations.

first step was to measure out all of the ingredients.  since my pistachios were already skinned and toasted, i eliminated the blanching and toasting step from the recipe.  actually, whenever i make biscotti, i always use untoasted nuts.  the reason behind this is that they have the potential to become over toasted in the second bake and that can give the biscotti a bitter and burnt taste.

this is a very lean recipe.  by lean i am referring to the fact that the only fat in the dough is what is present in the egg yolks and the nuts.  low fat isn't a bad thing unless you have dental issues because lean biscotti are hard biscotti.

the instructions for shaping the logs suggests flouring your hands.  with the number of logs i have baked, i can tell you don't use flour, use a little water instead.  a small amount of moisture on your hands will allow you to quickly shape the logs without the dough sticking to them.

out of the oven, i let them cool completely before slicing them.

be sure to use a very sharp serrated knife for clean cuts.

pistachios add nice color to the slices

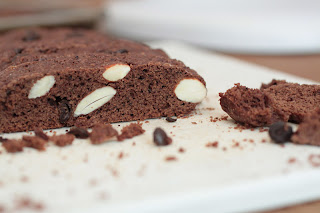
since i am also working on what i hope will be my next book, i mixed up a batch of my own recipe.  these are chocolate with almonds and coffee beans.  the biggest difference from the twd recipe and mine (besides the chocolate) is that these have a little less egg and a generous amount of butter.  that difference results in a lighter, softer crunch.  one guaranteed to be friendlier to your smile!

be sure to check out the tuesdays with dorie page to see the biscotti's from all of the participants!